Pages

Saturday, February 26, 2011

Homemade chalkboard paint and bucket

So, ever since I saw Attempting Aloha's post on homemade chalkboard paint here, I've been dying to try it out.  Then, I saw Freckled Laundry's tutorial for buckets with chalkboard paint here.  Combine them together and you have my project.

I picked up some buckets from Target's dollar bins.  You've just gotta love those bins!  Next, I decided to get all fancy pants and cut out nifty labels outlines on contact paper using my cricut machine. 


I proceeded to mix up my homemade chalkboard paint as directed in Attempting Aloha's post.  I know the whole idea of being homemade is to customize your color but I had extra black craft paint and just had to try it now!!  No waiting for me to pick just the right color.  I guess I can be like my four year old when it comes to instant gratification.  Anyways, I applied the paint as directed by Freckled Laundry's post.  I was sooo excited.  As I started to peel away the contact paper to reveal my chalkboard label, this happened.


Did I mention that I was going for instant gratification. So, I didn't really prepare the surface before painting on the bucket. Lesson learned.  Take two!  Made new label outlines and applied paint.  Then, oops.  I guess the step about priming with a piece of chalk after the paint is dry is really in there for a reason. So, much for instant gratification with this project.

Take three!  I applied just a smidge more chalkboard paint to fix that problem and now I call it done!


Wow!  What an idea following directions.  You would never have thought that I once was a teacher.  I think they turned out pretty cute.

Sharing them over at:
Join us Saturdays at tatertotsandjello.com for
 the weekend wrap up party! Frugal Friday @ 


Thursday, February 24, 2011

TV cart to Sewing cart

You've heard it many times.  I love thrifting.  It's that whole idea of finding an unbelievable treasure at an unheard of price.  Does it usually happen for me?  No.  Does it stop me from the hunt?  Not on your life!

On one particular thrifting trip at the Salvation Army, I stumbled upon an old TV cart for $4.  In an instant, I knew what I could do with it.  I have been keeping my sewing machine and serger in the corner on the floor of our bonus room upstairs forever now.  Apparently, it bothered my husband so much that he kept putting them into our attic storage.  What better to do with this old TV cart than turn it into a sewing cart (even better that the TV cart is on wheels).  When I took the picture, I already removed the wheels.


First order of business was to spray paint the frame and cover the shelves with contact paper.  Hubby was nice enough to reinforce the bottom shelf to hold the weight of both machines (notice the unsightly screws).  He's good like that!


I originally was going to use the contact paper on both shelves that you see above but decided it was a little too busy for the top.  I luckily was able to find white contact paper being discontinued at my local dollar store.  I was able to snatch up a 1.5 yd roll for only 25 cents!!

Next on the agenda was to make a nice little skirt to hide the sewing machine and serger on the bottom shelf.  I had some extra fabric and lace in my stash of fabrics.  I would have liked to make a more gathered skirt but I was trying to keep it on the cheap side by using what I already had. 


So $4.25 later, I have a prettier storage solution for my sewing machine and serger.  Hopefully, hubby won't wheel it into the attic storage now!  I plan on revamping my sewing basket to put on the top shelf.  I might even put a vase with flowers.   

I'm sharing over at:

Transformation Thursday  Furniture Feature Fridays
giveaways Photobucket


Monday, February 21, 2011

Scrabble Tile Pendants tutorial

Last week I had a group of gal pals over for a craft night.  We had a great time.  Not too long ago I posted about my soldered necklace pendant.  Well, I introduced a couple girls to the soldering iron.  But just in case they didn't feel up to that, I had plan B. 

Plan B was making some adorable scrabble tile necklace pendants.


All you need is:
Art work (I made mine on photoshop elements and printed it out onto a laser copy @ Kinko's), scrabble tiles ($3.99 @ Michael's), glue-on necklace bails (@ Hobby Lobby in fused work area), diamond glaze (Achiever's), glue stick, E6000, sand block, and black sharpie marker.


I decided a photo tutorial would be best for visual gals like me!


Now, just enjoy your own creation!


I'm sharing over at:
 The Girl Creative mmm button Keeping It Simple
Craft Link parties Show and Tell Green


Tuesday, February 15, 2011

Waste not, want not...Part 2

Sorry for the absence.  The weather has warmed up a little and I have been enjoying it. 

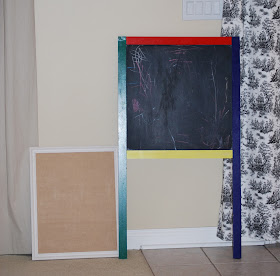
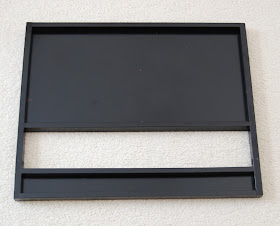
I have been recycling parts from my kids broken down chalkboard/dry erase board art easel.  I previously took the tray from the chalkboard/dry erase board and transformed it into a magnetic board.  Well, here is what I had left. 


I took an old empty frame only and the chalkboard side of easel.


I cut down chalkboard to fit the frame size, added a little pink pizazz, put them together, and now baby girl has a new chalkboard.

You got to love using what you have!  So, I could have thrown away an art easel.  Instead, I repurposed and now have a magnetic board and chalkboard! 


I plan on cutting up the remainder of the chalkboard and making little chalkboard labels for baskets. Also, hubby is going to use all of those colorful strips of wood that was the frame of the art easel to use as supports for some sagging shelves. The only thing I will wind up throwing away is the warped dry erase board. Before you toss something, ask yourself is it all a piece of trash or just part of it!


I'm sharing over at:
Today's Creative Blog handmade projects


Wednesday, February 9, 2011

Waste not, want not...

I'm sure you have all had something that has lived out it's life expectancy.  Well, that is what was happening to my kids chalkboard/dry erase easel.  The dry erase board was warped beyond repair.  So, why throw away all of it when there is still some salvageable parts?!

Here is the best picture I could find of a similar art easel to ours.


Step 1.  I disassembled the chalkboard.  Got the tray and spray painted it black.


Step 2.  I bought metal to make a magnetic board for top.  Lucky for me I had a gift card.  This has made this project free for me. 


Step 3.  Used my Dremel 200 for the first time to cut metal down to size.  I have to say I felt pretty powerful since sparks were flying.  Normally, I would have run away.  After I cut the metal, I glued down the metal with Liquid Nail.  Let it dry over night.   


Step 4.  Since I didn't achieve a straight cut on the bottom, I glued on black ribbon to hide the jagged edge.  I put 2 hook screws on and made pretty magnets using glass marble things and scrapbook paper.  Here you have my new magnetic board.  All I have to do is figure out just where I want to put it.


Stay tuned in to see what else I do with the rest of the disassembled art easel!

I'll be showing off my recycled art easel tray turned magnetic board over at:
Get Your Craft On TuesdayShow and Tell Green Make it Yours @ My Backyard Eden